Preparation time: 10-15 minutes
Cooling time: 30 minutes
A tasty ball of biscuits, coated with dark chocolate topped with a pieces of Cadbury's honeycomb crunch!
Ingredients:
200g Bourbon biscuits
200g Cadbury crunchie spread
200g Dark chocolate
Crushed up crunchie bars
Method:
1. Line a baking tray/dinner tray with greaseproof paper. Crush the bourbon biscuits in a food processor. If you dont have a food processor you can place the biscuits in a sealed bag and crush with a rolling pin. Once you have crushed your biscuits place into a bowl with the crunchie spread. Mix with hands until fully combined.
2. Scoop a tablespoon of mixture and roll it into a ball. Repeat this process until all the mixture has gone. Place into the freezer for around 10 minutes.
3. Melt the chocolate either in the microwave or over the pan. Take the balls out of the freezer and dunk one ball into the chocolate bowl at a time. Using two forks, coat the balls with the chocolate then lift the ball up onto one fork and gently shake it to drain the excess chocolate. Repeat this process until all the balls are coated. Place into the fridge for about 10-15 minutes.
4. When the balls are set, break the chocolate bar up into smalls pieces and sprinkle a bit on top of each ball.
There you go! I really hope you enjoyed this recipe, if you did please let me know. Please feel free to share, like and comment. If you have any requests on a recipe i should make please contact me via my social media. Be sure to check out more recipes here on MyFoodAddiction and i'll see you next Sunday with another delicious recipe! :-P x
Social medias:
Follow me on my blog: myfoodaddiction14.blogspot.com
Facebook: @MyFoodAddiction14
Instagram: @lauren_foodblogger
Sunday, 10 September 2017
Sunday, 3 September 2017
Jam meringue tarts
Preparation time: 30 minutes
Cooking time: 20 minutes
Makes: 12
These beautiful sweet jam tarts topped with meringues. Yes you may think why not lemon? But Jam and meringue still taste just as nice!
Ingredients:
Pastry:
220g Plain flour
140g Butter
Water
12 tsp Raspberry/Strawberry seedless jam
Meringue:
2 Egg whites
60g Caster sugar
Method:
1. Preheat the oven to 190℃. In a large bowl rub the flour and butter together until it forms breadcrumbs. Add a tablespoon of water until it combines together.
2. Flour the worktop and gently roll the dough out to 1cm thickness then place in the tart tray. Repeat this until you cant get any more tarts from the pastry. Add a teaspoon of jam into each tart.
3. To make the meringue whisk the egg whites into a bowl until it forms stiff peaks and slowly add in the sugar. Place into a piping bag with any nozzle of your choice. Pipe a swirl on top of each tart and bake in the oven for 20-25 minutes or until the meringue is crisp and golden and the pastry looks golden brown. Take out the oven to cool and transfer to a wire rack.
There you go! I really hope you enjoyed this recipe, if you did please let me know by hitting that +1 button at the bottom of this recipe. be sure to check out more recipes here on MyFoodAddiction and i'll see you next Sunday with another delicious recipe! :-P x
Social medias:
Follow me on my blog: myfoodaddiction14.blogspot.com
Facebook: @MyFoodAddiction14
Instagram: @lauren_foodblogger
Sunday, 27 August 2017
Fruit tarts
Preparation time: 30+ minutes
Cooking time: 10-20 minutes
Cooling time: 30+ minutes
Makes: 6
Sweet pastry cases filled with gelatin and fresh fruit.
Ingredients:
Pastry:
175g Plain flour
65g Butter
65g Caster sugar
1 Egg
1 Egg yolk for glaze
Filling:
Fresh fruit of your choice. I used kiwi, blueberries and strawberries
Dr Oetker leaf gelatine sheets
Method:
1. Preheat the oven to 190℃ and grease mini tart tins. In a large bowl, rub the flour and butter together, add the sugar then the egg and mix until a dough forms. Lightly flour the worksurface and knead until it becomes smooth.
2. Roll the dough about 2-3mm thick. Place greasproof paper inside the pastry and fill with baking beans. Blind bake for 15 minutes then lift the paper and beans out and brush with egg yolk and place back in the oven for another 8 minutes. When done, remove from the oven and carefully trim the edges and place onto a wire rack to cool.
3. Whilst the cases are cooling, start making the gelatine. Place 4 sheets into cold water for 5 minutes then squeeze out any excess water and place them into a saucepan on a low heat, melt slowly. Do not let the mixture boil. When melted take off heat to cool.
4. Whilst cooling, prepare the fruit however you want to and place into the pastry cases. When the gelatine has cooled and thickened a little, pour into each pastry case and place into the fridge to set.
There you go! I really hope you enjoyed this recipe, if you did please let me know by hitting that +1 button at the bottom of this recipe. be sure to check out more recipes here on MyFoodAddiction and i'll see you next Sunday with another delicious recipe! :-P x
Social medias:
Follow me on my blog: myfoodaddiction14.blogspot.com
Facebook: @MyFoodAddiction14
Instagram: @lauren_foodblogger
Sunday, 20 August 2017
Coconut ice
Preparation time: 10-15 minutes
Cooling time: 3 hours to overnight
A very simple and easy sweet treat for everyone to enjoy! With only 3 ingredients you'll make this in no time. You don't need to be an expert in baking!! Why dont you give it a go?
Ingredients:
250g Sweetened condensed milk
250g Icing sugar
200g Dessicated coconut
Pink food colouring (optional)
Method:
1. Using a metal spoon or a white spoon (so it doesn't stick) mix together the condensed milk and icing sugar in a large bowl. Be aware this will become very stiff to mix. If it becomes to hard to mix use your hands to combine it together.
2. Split the mixture into two and mix a drop of pink food colouring into one half. Dust a board with icing sugar and shape each half into a 3cm smooth rectangle. Place on top of another, run your hands over making sure both halfs connect with each other.
3. Transfer to a plate or a board and place in the fridge for 3 hours or overnight to set. When it has set cut into small squares with a sharp knife.
There you go! I really hope you enjoyed this recipe, if you did please let me know by hitting that +1 button at the bottom of this recipe. be sure to check out more recipes here on MyFoodAddiction and i'll see you next Sunday with another delicious recipe! :-P x
Social medias:
Follow me on my blog: myfoodaddiction14.blogspot.com
Facebook: @MyFoodAddiction14
Instagram: @lauren_foodblogger
Sunday, 13 August 2017
Triple chocolate cookie pops
Preparation time: 30-45 minutes
Cooking time: 10-15 minutes
Triple chocolate cookies with chocolate chips with chocolate fudge icing inside. Perfect for any chocolate lovers!
Ingredients:
Cookies:
125g Butter
100g Light brown sugar
125g Caster sugar
1 Egg
1tsp Vanilla extract
175g Self raising flour
50g Cocoa powder
100g Dark chocolate chips
Decoration:
Chocolate fudge icing (shop bought)
Any toppings/decorations you like, I used: (fudge, marshmallows, sprinkles, smarties)
Wooden lollipop sticks
Method:
1. Preheat the oven to 180°C and line baking trays with greaseproof paper. In a bowl cream the butter and sugars together until fluffy. Then combine the egg with the vanilla extract. Add the flour and cocoa powder until it forms cookie dough consistency. You can add in your chocolate chips too.
2. I weighed each cookie to exactly 15g to make sure they were the same size. When you have weighed the cookie dough out roll into a ball. Repeat this until all the dough has gone. You only need 6 cookies per tray. Place in the oven for 10-15 minutes until cracked. When cooked remove from oven and transfer over to a wire rack and set aside to cool before decorating.
3. For the decoration get two cookies and place the icing on the base of one cookie but make sure the icing oozes out, also place your lollistick on the cookie. Then place the other cookie on top like a sandwich and add your decoration round the side of the cookie.
There you go! I really hope you enjoyed this recipe, if you did please let me know by hitting that +1 button at the bottom of this recipe. be sure to check out more recipes here on MyFoodAddiction and i'll see you next Sunday with another delicious recipe! :-P x
Social medias:
Follow me on my blog: myfoodaddiction14.blogspot.com
Facebook: @MyFoodAddiction14
Instagram: @lauren_foodblogger
Sunday, 6 August 2017
Chocolate covered bananas
Preparation time: 10 minutes
Cooling time: 20 minutes
Makes: Around 8 bananas
Half a banana, coated with delicious dark chocolate topped with anyone's favourite topping. A simple quick and easy dessert that needs no cooking, just chilling in the fridge!
Ingredients:
Bunch of bananas
200g Dark chocolate
Any toppings you would like, I used; fudge, sprinkles, pearls, pistachios and smarties
Method:
1. Line a dinner tray with greaseproof paper before you start. Peel all the bananas and chop in half. Carefully push a lolli stick into the base of each banana. Melt the chocolate either over a pan or in the microwave. Once melted, dip the bananas and sprinkle with your toppings, laying them flat on the tray. Repeat for all bananas and place in the fridge to cool before serving.
There you go! I really hope you enjoyed this recipe, if you did please let me know by hitting that +1 button at the bottom of this recipe. be sure to check out more recipes here on MyFoodAddiction and i'll see you next Sunday with another delicious recipe! :-P x
Social medias:
Follow me on my blog: myfoodaddiction14.blogspot.com
Facebook: @MyFoodAddiction14
Instagram: @lauren_foodblogger
Sunday, 30 July 2017
Summer sprinkle cupcakes
Preparation time: 25 minutes
Cooking time: 20 minutes
Makes: 12
Jammy cupcakes topped with fluffy buttercream and sprinkles!
Ingredients
4oz Unsalted butter
4oz Self raising flour
4oz Caster sugar
2 Eggs
30g Seedless raspberry jam
Buttercream:
200g Unsalted butter (soft)
450g Sifted icing sugar
2tbsp Milk
½tsp Vanilla extract
Decoration:
Sprinkles
Method:
1. Preheat your oven to 180°C and line a cupcake tray with cases. In a bowl mix together the butter and sugar using an electric whisk. Whisk until light and fluffy, from there add in the eggs, jam and flour and carry on whisking until fully combined.
2. Spoon the mixture evenly into each case and place in the oven for about 15-20 minutes or until golden brown. When your cupcakes are done set aside to cool.
3. While your cupcakes are cooling its time to make the buttercream. Cream the butter into a large bowl whilst gradually adding the icing sugar. Cream until light and fluffy. Add the vanilla and milk and stir well. Spoon the buttercream into a large piping bag fitted with a nozzle of your choice! Pipe a swirl on each cupcake and top them with sprinkles.
There you go! I really hope you enjoyed this recipe, if you did please let me know by hitting that +1 button at the bottom of this recipe. be sure to check out more recipes here on MyFoodAddiction and i'll see you next Sunday with another delicious recipe! :-P x
Social medias:
Follow me on my blog: myfoodaddiction14.blogspot.com
Facebook: @MyFoodAddiction14
Instagram: @lauren_foodblogger
Sunday, 23 July 2017
Caramel balls
Preparation time: 10-15 minutes
Cooling time: 30 minutes
A tasty ball of biscuits, coated with dark chocolate topped with a piece of caramel oozing out.
Ingredients:
200g Bourbon biscuits
200g Cadbury caramel spread
200g Dark chocolate
120g Dairy milk caramel bar
Method:
1. Line a baking tray/dinner tray with greaseproof paper. Crush the bourbon biscuits in a food processor. If you dont have a food processor you can place the biscuits in a sealed bag and crush with a rolling pin. Once you have crushed your biscuits place into a bowl with the caramel spread. Mix with hands until fully combined.
2. Scoop a tablespoon of mixture and roll it into a ball. Repeat this process until all the mixture has gone. Place into the freezer for around 10 minutes.
3. Melt the chocolate either in the microwave or over the pan. Take the balls out of the freezer and dunk one ball into the chocolate bowl at a time. Using two forks, coat the balls with the chocolate then lift the ball up onto one fork and gently shake it to drain the excess chocolate. Repeat this process until all the balls are coated. Place into the fridge for about 10-15 minutes.
4. When the balls are set, break the chocolate bar into individual squares and cut one corner off and press down to squash the chocolate and pull the caramel out. Place the piece of chocolate on top of every ball.
There you go! I really hope you enjoyed this recipe, if you did please let me know by hitting that +1 button at the bottom of this recipe. be sure to check out more recipes here on MyFoodAddiction and i'll see you next Sunday with another delicious recipe! :-P x
Social medias:
Follow me on my blog: myfoodaddiction14.blogspot.com
Facebook: @MyFoodAddiction14
Instagram: @lauren_foodblogger
Sunday, 16 July 2017
Profiteroles
Preparation time: 30 minutes
Cooking time: 30 minutes
Serves: 8
Be prepared to use your arm muscles! These beautiful profiteroles will leave you wanting more.
Ingredients:
85g Unsalted butter
100g Plain flour
3 Eggs
250ml Double cream
100g Dark chocolate
Water
Pinch of salt
Method:
1. Preheat the oven to 200°C and place a tray of water at the bottom of the oven. Also line a baking tray with greaseproof paper for the profiteroles. For the choux pastry, add the butter and 220ml water into a saucepan and heat until the butter has melted. Then quickly add in the flour and salt. Remove from the heat and stir vigorously until a smooth paste is formed. Leave to cool for 15-20 minutes.
2. Beat in the eggs, a little at a time and stir until smooth and glossy and a soft drop consistency, you may not need it all. Using teaspoons spoon a blob of mixture onto your prepared baking tray. Place them in the oven for 25-30 minutes.
3. Remove from the oven and prick the bottom of each one with a skewer, transfer to a wire rack and place upside down with the holes pointing upwards.
4. For the filling, whip the cream in a bowl. When the profiteroles are cold use a piping bag to insert the cream. Melt the chocolate and drizzle on top.
There you go! I really hope you enjoyed this recipe, if you did please let me know by hitting that +1 button at the bottom of this recipe. be sure to check out more recipes here on MyFoodAddiction and i'll see you next Sunday with another delicious recipe! :-P x
Social medias:
Follow me on my blog: myfoodaddiction14.blogspot.com
Facebook: @MyFoodAddiction14
Instagram: @lauren_foodblogger
Sunday, 9 July 2017
Jammie Dodgers
Preparation time: 1 hour
Cooking time: 12 minutes
Makes: 20 biscuits
A beautiful buttery biscuit sandwiched together with jam
Ingredients
100g Unsalted butter
175g Caster sugar
1 Large egg
1tsp Vanilla paste
200g Plain flour
Seedless strawberry/raspberry jam
Method:
1.Preheat the oven to 180°C. In a bowl, mix together the butter and sugar with a wooden spoon until well combined. Add the egg and vanilla and continue to beat by hand until fully combined. Gradually add the flour and mix until combined, then shape into a ball.
2. If the dough is too soft place into the fridge for 10 minutes to firm up. Roll the dough out onto a floured surface and roll to a depth of 5mm.
3. You can use whatever cutters you like just make sure you have 2 cutters, one big, one small for the middle. Cut base biscuits and cut the top biscuits with a hole in the middle. Re roll the dough if you run out of space to cut. Place the biscuits onto a greased baking tray and place in the oven for 12 minutes or until golden brown.
4. When cooked let them cool before transferring them to a wire rack. When the biscuits have completely cooled spread a decent amount of jam onto the base of the biscuits. Then place the top biscuits on top and gently press down.
There you go! I really hope you enjoyed this recipe, if you did please let me know by hitting that +1 button at the bottom of this recipe. be sure to check out more recipes here on MyFoodAddiction and i'll see you next Sunday with another delicious recipe! :-P x
Social medias:
Follow me on my blog: myfoodaddiction14.blogspot.com
Facebook: @MyFoodAddiction14
Instagram: @lauren_foodblogger
Sunday, 2 July 2017
*STUDENT CHEF OF THE YEAR COMPETITION*
On June 30th 2017 I got to represent my school at the Student Chef Of The Year competition in Buxton. I was delighted that I had been chosen to go and was excited to feel the experience of a competition.
We had to make a meal and a dessert based on the eat well guide for teenagers.
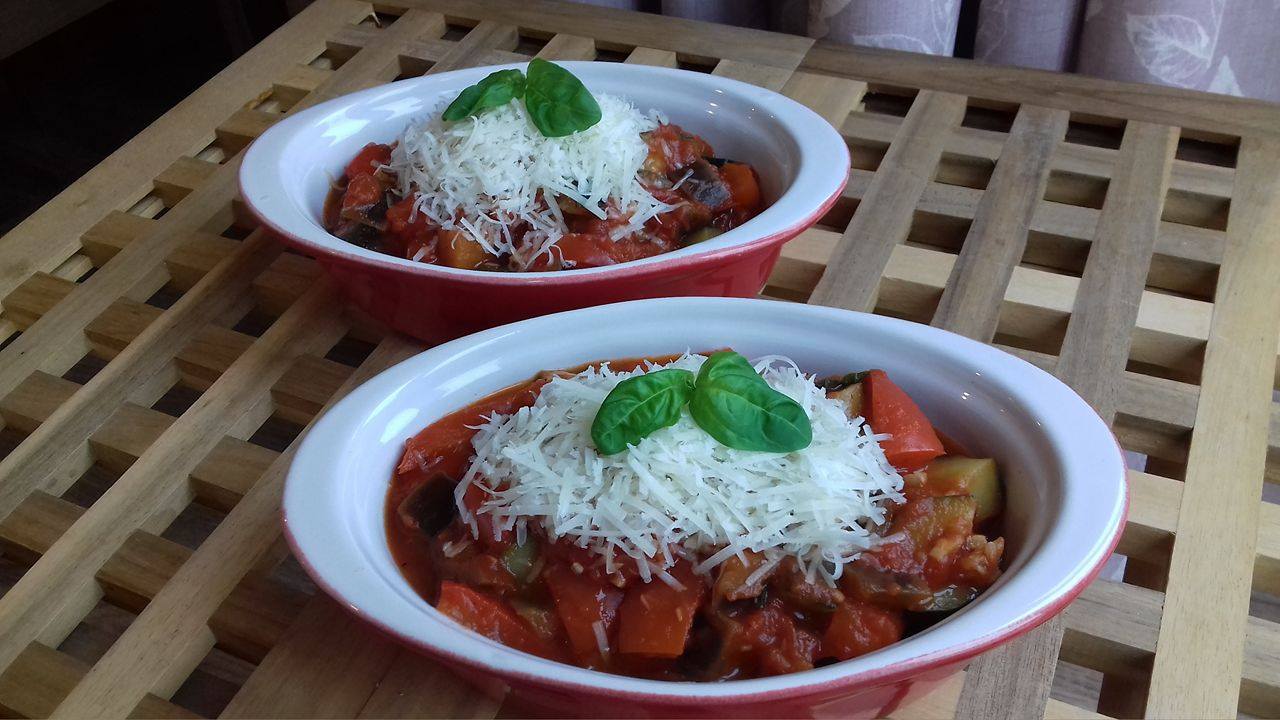
My meal was: Ratatouille served with crusty baguette pieces
My dessert was: Crepes topped with chocolate, served with strawberries and whipped cream
We also had to have a theme for our presentation table and mine was France. Here is a picture
In the awards ceremony, I won .... Best Presentation Table!!!
I am going to put both my meal and dessert onto my blog and the recipes are just underneath this post.
Many thanks to the University of Derby, Buxton campus in the Devonshire dome for holding the event and all the staff and judges, but most thanks to my Food technology teacher for choosing me!
Competition recipes
![]() |
| Meal: Ratatouille |
Cooking time: 20 minutes
Makes: 2 portions
A vegetable Ratatouille topped with delicious hard cheese and not forgetting the basil.
Ingredients
½ Aubergine
1 Courgette
390g Tinned tomatoes
1 Pepper
1 Garlic clove
1 Vegetable stock cube
20g Hard cheese
2 hearts of basil
Pinch of salt and pepper
Oil
4 basil leaves (chopped up small)
Method:
1. Firstly boil the kettle and make the stock cube in half a cup of water. On a chopping board, chop the courgette up. Cut the top and bottom of and cut in half. Chop into thick slices. Then chop the thick slices into quarters. Place this into a plastic bowl.
2. Next chop the pepper up. Cut the top off and remove insides with seeds. Cut in half , then half again. Cut the halfs into 3 slices and then cut the 3 slices into 3 chunks. Place this into a plastic bowl.
3. After this chop the aubergine up. Cut in half and chop either the top or bottom off. Cut into thick slices. Then chop the thick slices into thirds and thirds again. Place this into a heavy bottomed saucepan. Peel and chop the garlic into dices. Leave on chopping board.
4. Add a dessert spoon of olive oil into the saucepan of aubergines and fry for about 2 minutes on a medium heat. Add the courgettes, pepper, garlic and carton of tomatoes including a pinch of salt and pepper. Leave to simmer on a medium heat with the lid on. As soon as it starts to bubble reduce the heat to low. Keep stiring every 5 minutes.
5. When the vegetables have softened take off the heat and add some chopped up fresh basil. Mix in and leave to cool slightly before serving. When its slightly warm serve into your dishes and top with grated cheese and a heart of basil.
![]() |
| Crepes |
Preparation time: 5-10 minutes
Cooking time: 10-15 minutes
Makes: 5 crepes
A beautiful light golden crepes filled with chocolate sauce and strawberries bursting out, topped with chocolate sauce and a strawberry fan and a squirt of cream on the side.
Ingredients:
100g Plain flour
2 Eggs
300ml Milk
Vegetable oil
Chocolate sauce
Whipped squirty cream
Strawberries
Method:
1. In a bowl, mix the flour, eggs and milk together uses and electric whisk. Add a small amount of oil into a frying pan and add 2 ladel's of the pancake mixture and tilt the pan round until all the mixture fills the base. With a spatula flip the pancake over when it starts to slide and release from the edges. Keep flipping until a nice golden colour appears. Place onto a plate and leave to cool.
2. When cool, spread chocolate sauce down the middle with a knife and shape into a cone. Lay the diced strawberries coming out the top of the pancake and drizzle chocolate sauce over the top of the pancake, followed by a fan strawberry and a squirt of whipped cream.
Sunday, 25 June 2017
Malteser Balls
Preparation time: 10-15 minutes
Cooling time: 30 minutes
Delicious balls of maltesers. Quick and easy to make with no cooking!
Ingredients
200g Malted milk biscuits
200g Malteaser spread
200g Milk chocolate
Crushed malteasers
Method:
1. Line a baking tray/dinner tray with greaseproof paper. Crush the malted milk biscuits in a food processor. If you dont have a food processor you can place the biscuits in a sealed bag and crush with a rolling pin. Once you have crushed your biscuits place into a bowl with the malteaser spread. Mix with hands until fully combined.
2. Scoop a tablespoon of mixture and roll it into a ball. Repeat this process until all the mixture has gone. Place into the freezer for around 10 minutes.
3. Melt the chocolate either in the microwave or over the pan. Take the balls out of the freezer and dunk one ball into the chocolate bowl at a time. Using two forks, coat the balls with the chocolate then lift the ball up onto one fork and gently shake it to drain the excess chocolate. Repeat this process until all the balls are coated. Place into the fridge for about 10-15 minutes.
4. When the balls are set, crush up some malteasers and sprinkle on top.
There you go! I really hope you enjoyed this recipe, if you did please let me know by hitting that +1 button at the bottom of this recipe. be sure to check out more recipes here on MyFoodAddiction and i'll see you next Sunday with another delicious recipe! :-P x
Social medias:
Follow me on my blog: myfoodaddiction14.blogspot.com
Facebook: @MyFoodAddiction14
Instagram: @lauren_foodblogger
Sunday, 18 June 2017
Vanilla and pistachio biscuits
Preparation time: 15 minutes
Cooking time: 15 minutes
Cooling time: 30 minutes
Makes: 12
Fresh vanilla biscuits, half dipped in white chocolate topped with crushed pistachios
Ingredients:
150g unsalted butter
150g light muscovado sugar
Pinch of salt
1tsp Vanilla bean paste
250g Plain flour
100g Pistachios (crushed)
200g White chocolate
Method:
1. Preheat the oven to 180°C and line 2 baking trays with grease-proof paper. Cream together the butter, sugar, salt and vanilla paste, into a bowl. Gradually add the flour in to form a dough.
2. Once a dough is created cut the dough in half and roll into 5cm diameter cylinders on a floured surface. Chill in the fridge for at least 20 minutes
3. When chilled, remove from the fridge and slice into 1cm thick rounds. Place these on a baking tray and bake for 15 minutes until golden. When cooked take them out of the oven and place onto a wire rack to cool. Leave the trays how they are as you will use them later on.
4. When cooled, crush the pistachios in a bowl or in a food processor. Melt the white chocolate either in a pan or in the microwave. Dip half of the biscuit into the chocolate and sprinkle with pistachios on top. Repeat this for each biscuit and place back onto the baking tray you cooked them on.
5. Place in the fridge for about 10-15 minutes before serving
There you go! I really hope you enjoyed this recipe, if you did please let me know by hitting that +1 button at the bottom of this recipe. be sure to check out more recipes here on MyFoodAddiction and i'll see you next Sunday with another delicious recipe! :-P x
Social medias:
Follow me on my blog: myfoodaddiction14.blogspot.com
Facebook: @MyFoodAddiction14
Instagram: @lauren_foodblogger
Sunday, 11 June 2017
Flapjack
Preparation time: 10 minutes
Cooking time: 20 minutes
Makes: 9
A lovely oaty flapjack topped with smarties, everyone's favourite!
Ingredients:
125g Butter
10tbsp Golden syrup
100g Light brown sugar
250g Oats
Pack of smarties
Method:
1. Preheat the oven to 180°C and line a 20cm square baking tin with greaseproof paper. Melt the butter in a medium pan over a low heat then add the golden syrup and sugar. Heat gently until the sugar has dissolved and stir until everything is well combined.
2. Remove from the heat and stir in the oats. Mix until well combined. Pour into the tin, spread and squash down with a metal spoon. Bake in the oven for 20 minutes.
3. While still warm press the smarties into the top. Leave to cool and once cool cut into squares.
There you go! I really hope you enjoyed this recipe, if you did please let me know by hitting that +1 button at the bottom of this recipe. be sure to check out more recipes here on MyFoodAddiction and i'll see you next Sunday with another delicious recipe! :-P x
Social medias:
Follow me on my blog: myfoodaddiction14.blogspot.com
Facebook: @MyFoodAddiction14
Instagram: @lauren_foodblogger
Sunday, 4 June 2017
Biscoff balls
Preparation time: 10-15 minutes
Cooling time: 30 minutes
A proper biscoff ball for all the biscoff lovers out there. Biscoff biscuit with biscoff spread coated in caramac chocolate.
Ingredients
200g Biscoff biscuits (save a few for crumbs)
100g Biscoff spread
110g Caramac buttons
1. Line a baking tray/dinner tray with greaseproof paper. Crush the biscoff biscuits in a food processor. If you dont have a food processor you can place the biscuits in a sealed bag and crush with a rolling pin. Once you have crushed your biscuits place into a bowl with the biscoff spread. Mix with hands until fully combined.
2. Scoop a tablespoon of mixture and roll it into a ball. Repeat this process until all the mixture has gone. Place into the freezer for around 10 minutes.
3. Melt the caramac either in the microwave or over the pan. Take the balls out of the freezer and dunk one ball into the caramac bowl at a time. Using two forks, coat the balls with the caramac then lift the ball up onto one fork and gently shake it to drain the excess chocolate. Repeat this process until all the balls are coated. Place into the fridge for about 10-15 minutes.
There you go! I really hope you enjoyed this recipe, if you did please let me know by hitting that +1 button at the bottom of this recipe. be sure to check out more recipes here on MyFoodAddiction and i'll see you next Sunday with another delicious recipe! :-P x
Social medias:
Follow me on my blog: myfoodaddiction14.blogspot.com
Facebook: @MyFoodAddiction14
Instagram: @lauren_foodblogger
Sunday, 28 May 2017
Blondies
Preparation time: 15-20 minutes
Cooking time: 25-30 minutes
Makes: Around 12 squares
These white chocolate blondies are beautifully soft and fluffy and is filled with dark chocolate chips. Very easy to make and perfect for all the family to enjoy
Ingredients
Cooking time: 25-30 minutes
Makes: Around 12 squares
These white chocolate blondies are beautifully soft and fluffy and is filled with dark chocolate chips. Very easy to make and perfect for all the family to enjoy
Ingredients
115g White chocolate
100g Dark chocolate chips
115g Margarine
3 Eggs
200g Soft light brown sugar
1tsp Vanilla extract
Pinch of salt
150g Plain flour
Method:
1. Preheat your oven to 180°C/Gas mark 4 and lightly grease a 33 x 23cm/13 x 9 inch rectangular cake tin with butter or margarine.
2. Break your chocolate into a bowl. TIP: Hit your chocolate on the side of your worktop to break the chocolate up, then all you need to do is open the wrapper and pour it in the bowl. Add your margarine to the bowl. TIP: Use a knife to add your margarine instead of a spoon as it is easier. You can either melt it on a pan or in the microwave. TIP: I would use a microwave as its quicker and less cleaning up. When your chocolate has melted leave it to one side to cool down to room temperature.
3. In another bowl beat your sugar, eggs, vanilla extract and salt together until creamy.When your mixture is all creamy check to see if your chocolate is at room temperature, if it is pour it into your mixture. FACT: If you put your chocolate in whilst its too warm it can curdle the egg.
4. Using a metal spoon carefully fold and stir in the chocolate to your mixture. When that's done add a little bit of your flour to the mixture at a time and keep folding and stirring it in. When all your flour is mixed in add your dark chocolate chips and gently stir in.
5. Pour all your mixture into your rectangular cake tin and spread evenly with a metal spoon. Bake in the oven for around 30 minutes until it has just set. When it has cooked remove from the oven and place aside to completely cool.
6. Run a round bladed knife round the edge of the baking tin and invert (turn upside down) onto a baking sheet. Place another baking sheet on top of the brownies and invert again do they're the right way up. Cut into squares or bars for serving and store in an airtight container for up to 1 week.
There you go! I really hope you enjoyed this recipe, if you did please let me know by hitting that +1 button at the bottom of this recipe. be sure to check out more recipes here on MyFoodAddiction and i'll see you next Sunday with another delicious recipe! :-P x
Social medias:
Follow me on my blog: myfoodaddiction14.blogspot.com
Facebook: @MyFoodAddiction14
Instagram: @lauren_foodblogger
Social medias:
Follow me on my blog: myfoodaddiction14.blogspot.com
Facebook: @MyFoodAddiction14
Instagram: @lauren_foodblogger
Sunday, 21 May 2017
Chocolate rose meringues
Preparation time: 30 minutes
Cooking time: 90 minutes
Makes: 12
A sweet chewy meringue with a delicious taste of dark chocolate
Ingredients:
1 Egg white
Pinch of salt
50g Caster sugar
Drop of vanilla extract
Red or pink food colouring
60g Dark chocolate
Method:
1. Preheat the oven to 95°C and line a baking tray with greaseproof paper. In a bowl, whisk the egg whites with salt until foamy. Gradually add in the sugar until firm peaks form. Add the vanilla extract and the smallest drop of food colouring.
2. Fit a piping bag with a large star tip and make 4 lines of food colouring inside the piping bag. Spoon the meringue mixture into the piping bag and pipe 5cm meringues , you should be able to fit 4 on one row. Bake in the oven for 90 minutes. When cooked leave them to completely cool.
3. Melt the chocolate either in the microwave or over a pan. Dip the bottoms of the meringues into the chocolate and place back on the baking tray. Place in the fridge to cool before serving.
There you go! I really hope you enjoyed this recipe, if you did please let me know by hitting that +1 button at the bottom of this recipe. be sure to check out more recipes here on MyFoodAddiction and i'll see you next Sunday with another delicious recipe! :-P x
Social medias:
Follow me on my blog: myfoodaddiction14.blogspot.com
Facebook: @MyFoodAddiction14
Instagram: @lauren_foodblogger
Sunday, 14 May 2017
Lemon balls
Preparation time: 10-15 minutes
Cooling time: 30 minutes
A beautiful lemon ball coated in white chocolate, topped with lemon zest
Ingredients
200g Lemon puff biscuits
20g Butter (melted)
200g White chocolate
Lemon zest for topping
Method:
1. Line a baking tray/dinner tray with greaseproof paper. Crush the lemon biscuits in a food processor. If you dont have a food processor you can place the biscuits in a sealed bag and crush with a rolling pin. Once you have crushed your biscuits place into a bowl with the melted butter. Mix with hands until fully combined.
2. Scoop a tablespoon of mixture and roll it into a ball. Repeat this process until all the mixture has gone. Place into the freezer for around 10 minutes.
3. Melt the chocolate either in the microwave or over the pan. Take the balls out of the freezer and dunk one ball into the chocolate bowl at a time. Using two forks, coat the balls with the chocolate then lift the ball up onto one fork and gently shake it to drain the excess chocolate. Repeat this process until all the balls are coated. Sprinkle the lemon zest on top. Place into the fridge for about 10-15 minutes.
There you go! I really hope you enjoyed this recipe, if you did please let me know by hitting that +1 button at the bottom of this recipe. be sure to check out more recipes here on MyFoodAddiction and i'll see you next Sunday with another delicious recipe! :-P x
Social medias:
Follow me on my blog: myfoodaddiction14.blogspot.com
Facebook: @MyFoodAddiction14
Instagram: @lauren_foodblogger
Sunday, 7 May 2017
Chocolate orange mini cheesecakes
Preparation time: 20 minutes
Cooling time: 2 hours
Makes: 4-5 mini cheesecakes
Ingredients:
180g Chocolate orange digestive biscuits
75g Melted butter
397g Can of carnation condensed milk
300g Light soft cheese
Juice and zest of 2 oranges
Tinned oranges
Drizzle of dark chocolate
Method:
1. Line a baking tray or dinner tray with greaseproof paper and to do the mini cheesecakes i used non stick metal egg rings.
2. In a food processor, add in the chocolate orange biscuits and crush until breadcrumbs. If you do not have a food processor then you can place the biscuits in a sealed bag and bash with a rolling pin. When your biscuits are into breadcrumbs tip into a bowl. Melt the butter over a low heat and add into the biscuit bowl, mix well. Spoon the crumbs into the tins evenly and press down until as flat as possible. Chill in the fridge for about 10 minutes.
3. Pour the condensed milk, juice and zest of 2 oranges and the soft cheese into a bowl and whisk together until it thickens. Pour on top of the biscuit base in the tin. Chill in the fridge for 2 hours.
4. When it has set, carefully take the cheesecake out of the tin by lifting the tin up gently. Place some oranges on top and melt some chocolate to drizzle of top!
There you go! I really hope you enjoyed this recipe, if you did please let me know by hitting that like button (+1) down below at the bottom of this recipe. Meanwhile check out more recipes at MyFoodAddiction! I'll see you next Sunday with another delicious recipe! :-P x
Social media:
Follow me on my blog: myfoodaddiction14.blogspot.com
Facebook: @MyFoodAddiction14
Instagram: @lauren_foodblogger
Subscribe to:
Posts (Atom)


